INDURE: Indiana Database
for University Research Expertise
Instructions for
Populating the INDURE Database
Prepared by:
Aditya P. Mathur
Original version:
May 26, 2008
Last update: June
18, 2008
Heads of
Departments: If you want
to appoint someone in your department to map faculty to research areas and
enter faculty related information, please send a request to your INDURE
institutional representative:
Ball
State University: Michael Halbrook [mlhalbrook@bsu.edu]
Indiana
University:
Purdue
University: Aditya
Mathur
University
of Notre Dame: Terri
Hall [mailto:Hall.74@nd.edu]
IMPORTANT
(READ THIS FIRST):
- The INDURE effort aims at
creating a comprehensive online database of ALL faculty researchers at
academic institutions in the state of Indiana. Department heads, and/or
their assistants, in participating state academic institutions are
requested to complete the following tasks for each faculty member in their
department.
·
(Push) Map your faculty to all
relevant research
areas, not only to the field(s) most closely associated within the department.
Task 3 below can help you accomplish PUSH.
· (Pull) For each research area
closely associated with the department, map all relevant members of your
faculty from other
departments to that area. Task 5, together with Tasks 3 and 4 can help you
accomplish PULL.
Summary:
|
To perform this task… |
See instructions under.. |
|
Log into INDURE |
Task 1 |
|
Log out of INDURE. |
Task 2 |
|
Assign Research Areas
to Faculty |
Task 3 |
|
Add a new research
area to INDURE |
Task 4 |
|
Assign a research area
to multiple faculty |
Task 5 |
|
Add a faculty member |
Task 6 |
|
Update faculty information: Admin status, Faculty status, Email,
Keywords, Department, URL |
Task 7 |
|
View all assignments for faculty in your department (for
department heads) |
Task 8 |
|
Add a Keyword List |
Task 9 |
|
Add a new Appointment Type |
Task 10 |
|
Add a new College |
Task 11 |
|
Map an existing
Department to a College |
Task 12 |
Instructions
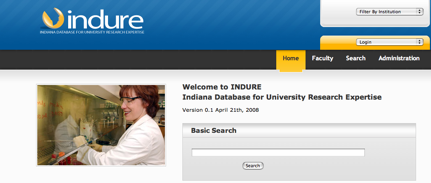
Task 1: Log
into INDURE.
- Go to http://www2.itap.purdue.edu/indure/
- Pull down the
Login menu located near the upper right corner.
- Select your
university/college.
- Type in your login credentials.
- The authentication system of
your university will check your credentials and accordingly log you in. Contact
your university’s INDURE institutional representative in case of any
difficulty.
Screen 1:
Login
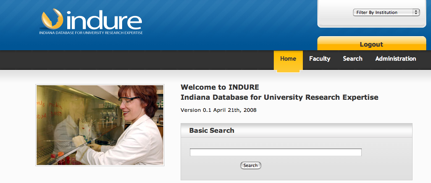
Task 2: Log
out of INDURE.
1.
After you have
logged in to INDURE, the “Login” tab will changer to “Logout.” Click on the
Logout tab to log out of INDURE.
Task 3: Assign
Research Areas to Faculty
- Log into INDURE. If you are already logged in
then simply click on the “Administration” tab located towards the top
right of the screen and go to step 3.
Screen 2:
Administration
- Click on the “Administration” tab located towards
the top right of the screen.
- Click the
"Faculty" tab.
Screen 3:
Faculty
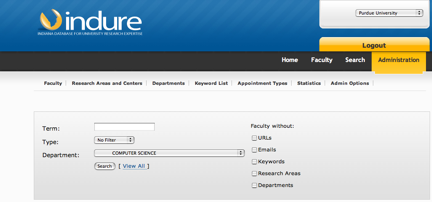
- From the “Department” pull down menu select the
department of interest. Click the “Search” button. You should now see a
list of all members of the faculty in the selected department.
Screen 4:
Faculty Edit
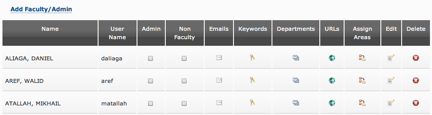
- Starting at the “Admin” and ending at the
“Delete” tab, the faculty display screen consists of nine distinct tabs
that allow you to edit a variety of information about a faculty member.
Select a tab that corresponds to the type of information you want to edit.
For example, to assign a research area, select the “Assign Areas” tab.
Caution: Use the “Delete” tab with extreme caution, as clicking
on it will delete all information on the selected faculty member.
Screen 5:
Research Areas
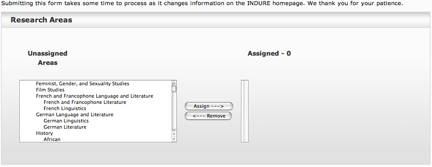
- In the areas box on the left is a list of all
research areas currently in INDURE. You may select up to 10 distinct areas
to assign to a faculty member. Select an area by clicking on it or by CTRL
clicking on it when selecting multiple areas. Then click the “Assign”
button to the right of the areas box. In a few moments the selected areas
should appear in the box towards the right.
Screen 6:
Assign Research Areas
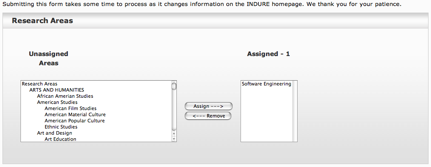
- After completing the assignment of research area,
click on the “faculty” tab to return to the “Faculty” screen.
- You may now edit additional information for the
selected faculty member or proceed to edit information on another faculty
member.
Task 4: Add a
new research area to INDURE
- Login to INDURE if not already
logged in, and execute steps 1 and 2 in Task 3 above.
- Click the tab "Research
Areas and Centers." This leads you to a screen that shows all
research areas currently in INDURE.
Screen 7:
Add Research Area or Center

- Scroll down the list and make
sure that the area you want to add to INDURE does not already exist. There
is a good chance that an existing area is identical to very close to the
area you wish to add. If you do not find a matching area, then click on
the tab “Add Research Area or Center.”
Screen 8: List of Research Areas

- Type in a brief name of the
research area you want to add to INDURE. Then scroll down the box in the
center of the screen and select a parent area for the new research area
that you want to add. It is important that you select the parent carefully
so as to maintain an appropriate hierarchy of research areas in INDURE.
Also add a brief note in the box labeled “Note” indicating your name,
affiliation and the date when you added a new research area.
Screen 9:
Research Area Added

- Click on the “Submit” button.
The new research area will now be added to the existing list of research areas and you will return to
the screen that shows all research areas in INDURE.
Task 5: Assign
a research area to multiple faculty
- Log into the database as
described in Task 1 and go to Step 2. If you are already logged in then
simply click on "Administration” and go to Step 3.
- Click on the tab labeled
"Administration".
- Click on the tab labeled "Research Areas and Centers.”
- You will now see the list of all
Research Areas and Centers included in INDURE. Select a research area or
center to which you would like to assign one or more faculty. Then click
on the “Manage Faculty Assignments” tab.
- You will now see a screen with
two boxes. The box on the left contains a list of faculty and the box on
the right contains faculty that have already been assigned to the selected
Research Area or Center.
Screen 10:
Faculty List for Assigning to a Research Area
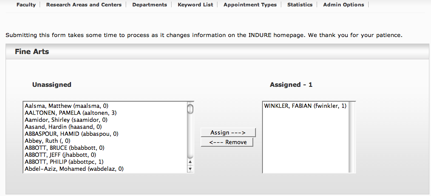
- Select faculty from the box on
the left that you want to assign to the selected research area. Use the
shift-click or CNTR-click to select multiple faculty members. All selected faculty will show as
highlighted entries in the box on the left.
- Click on the “Assign” tab. In a
few moments the selected faculty will appear in the box on the right. The
assigned faculty members are removed from the box on the left.
Task 6: Add a
faculty member
- Log into the database as described in Task 1 and
go to Step 2. If you are already logged in then simply click on
"Administration” and go to Step 3.
- Click on the tab labeled
"Administration".
- Click on the “Faculty” tab.
- Click on the “Add Faculty/Admin” tab.
- Fill all entries for the faculty member you wish
to add and click “Submit.”
Important: The “User Name” entry must correspond to the login ID of
the faculty member at your university. This is the ID that the added
faculty member will use to login to INDURE.
Screen 11:
New Faculty Information

Task 7: Update
faculty information: Admin status, Faculty status, Email, Keywords, Department,
URL
- Log into the database as
described in Task 1 and go to Step 2. If you are already logged in then
simply click on "Administration” and go to Step 3.
- Click on the tab labeled
"Administration".
- Click on the “Faculty” tab.
- In the box labeled “TERM” type
the last name of the faculty member whose record you wish to update. Click the “Submit” button.
Screen 12:
Faculty Data Edit

- You should now see a list of all
entries with the last name that you typed in the previous step. Click on
the appropriate tab in the entry corresponding to the faculty member whose
data you wish to update. The tab labels are “Admin,” “Non Faculty,”
“Emails,” “Keywords,” “Departments,” “URLs,” “Assign Areas,” “Edit,” and “Delete.”
- You should now be in a screen
that corresponds to the tab you clicked in the previous step. Fill in the
required information and click on “Submit.”
- Repeat steps 3 till 6 to update
information on any other faculty member.
Task 8: View
all assignments for faculty in your department.
- Log into the database as
described in Task 1 and go to Step 2. If you are already logged in then
simply click on "Administration” and go to Step 3.
- Click on the tab labeled
"Administration".
- Scroll down the Department list
and select the department you are interested in.
- Click the “Search” button and
you will see a list of all faculty members in the elected department.
Prior to clicking on the “Search” button you could narrow the list by
checking attributes such as “URL” to indicate that you want list of only
faculty in the selected department that no URL in INDURE.
- You may now select the faculty
member of interest and view the associated data by clicking in the appropriate
column.
Task 9: Add a
Keyword List
1.
Log into the
database as described in Task 1 and go to Step 2. If you are already logged in
then simply click on "Administration” and go to Step 3.
2.
Click on the tab
labeled "Administration".
3.
Click on the tab labeled
“Keyword List.” Existing keyword lists in INDURE will now be displayed.
Screen: Add
Keyword List
4.
Click on the tab
labeled “Add Keyword List.”
5.
Type the name
of the keyword list you want to add, and select the file that contains the
corresponding list of keywords. This file must be a text only file (cannot be a
pdf or a WORD doc file).
Screen 13:
New Keyword List

6.
Click “Submit.” You
will now see the updated list of keyword lists.
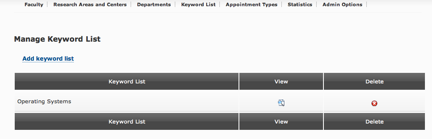
Screen 14:
Updated List of Keyword Lists

7.
You may view any keyword
list by selecting the View icon next to the list.
Task 10: Add a
new Appointment Type
1.
Log into the
database as described in Task 1 and go to Step 2. If you are already logged in
then simply click on "Administration” and go to Step 3.
2.
Click on the tab
labeled "Administration".
3.
Click on the tab
labeled “Appointment Types.” Existing appointment types will now be displayed.
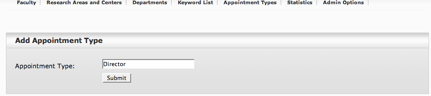
4.
Click on the tab
labeled “Add appointment type.” Enter the appointment type and click on
“Submit.”
Screen 15:
Adding an Appointment Type
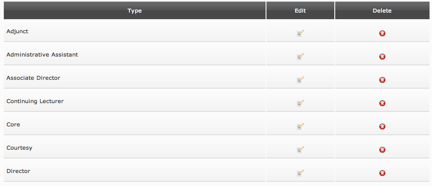
5.
The new appointment
will now appear in the list of Appointment Types.
Screen 16:
Updated List of Appointment Types
Task 11: Add a
new College
1.
Log into the
database as described in Task 1 and go to Step 2. If you are already logged in
then simply click on "Administration” and go to Step 3.
2.
Click on the tab
labeled "Administration".
3.
Click on the tab
labeled Departments.
4.
Click on Add
College.
5.
Select a campus
from the pull down menu labeled Campus.
6.
Enter the exact
name of the college you wish to add.
7.
Click on Submit.
Task 12: Map
an existing Department to a College
1.
Log into the
database as described in Task 1 and go to Step 2. If you are already logged in
then simply click on "Administration” and go to Step 3.
2.
Click on the tab labeled
"Administration".
3.
Click on the tab
labeled Departments.
4.
Scroll down the
list of universities and click on the Edit icon located to the right of the
department you wish to map.
5.
Scroll down inside
the box labeled School/College and select the college to which you wish to map
the selected department.
6.
Please type in your
name and date in the Notes box.
7.
Click on Submit.
<End of
Instructions>