Project 3: CS180 Burgers 'R Us
Assigned: Tuesday, March 1, 2011
Due: 11:59pm, Friday, March 11, 2011 (but you are welcome to turn it in early.)
Objective
The objective of this project is to provide further experience with abstraction and all the coding constructs you have learned (up through exceptions) to write a moderately sized Java program. You should be familiar with the material from the lectures, recitations, and book readings up to this point. Note that this project is considerably larger in scope than the previous projects - you will be developing five classes (although each can be done using only 50 to 100 lines of code.) You should start as early as possible and ask questions when they arise.
Setup
Before you begin, you need to create a folder called project3 in the CS180 folder to hold your .java files for this project. Use the terminal to create this folder:
>> pwd
/home/yourlogin/CS180
>> mkdir project3
>> cd project3
Overview
For this project, you will develop parts of a program which simulates the process of placing orders and cooking orders at a restaurant (in our case, a burger joint tastefully named CS180 Burgers 'R Us). Your task is to implement three unique types of chefs - a QueueChef, a StackChef, and a ValueChef - and organize the kitchen (class Kitchen) and its placed orders (class OrderManager) from the diners. The GUI (Graphical User Interface) and a simple class to represent an Order have been provided for you.
Here is a summary of the provided classes and interfaces, with links to their APIs. Succinctly, this is what we have provided in the jar file:
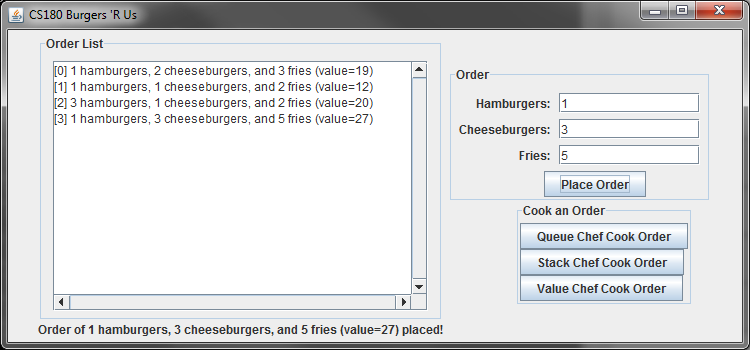
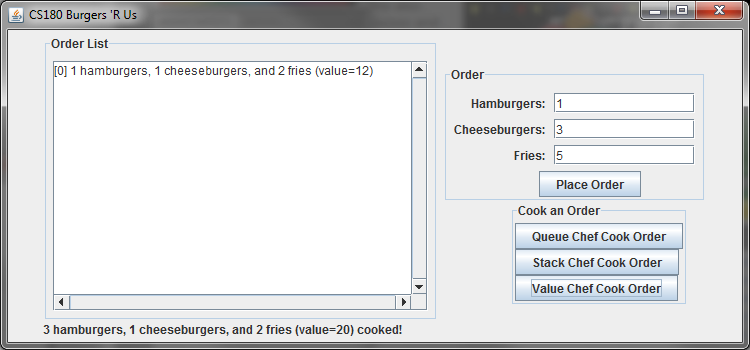
A BurgerJoint object contains both a KitchenInterface and three Chef objects (see Project3.java to see how everything is arranged). Once the GUI is started, iteraction with your program is based solely on the buttons provided in the GUI. Here's an example picture of the GUI after adding four orders to the OrderList:
Orders
As seen in GUI above, an order in the restaurant consists of a number of hamburgers, a number of cheeseburgers, and a number of french fries and is represented by the Order class provided. For the most part, the class is a collection of accessor and mutator methods for each of the food items which can be in an order. The order's value is calculated using the class's constants and can be computed using the provided getOrderValue method. For your convenience, we have also overridden the toString and equals methods for debugging (and grading) purposes.
While you likely won't need to instantiate your own Order objects (the GUI will do so when an order is placed), you do need to be familiar with the type and its methods when designing your program.
Step 1: Managing an Order List
As this project is quite large compared to prior projects, there are many moving classes and interfaces which you will have to manage. To begin, let's design the OrderManager class which implements the OrderList interface. In a nutshell, a list of N orders can be represented by an array of Order objects of size N, where N represents the maximum number of orders that the kitchen can handle. While you may find it useful to implement additional methods, you minimally must implement all the methods in the OrderList inteface (for more details, see the API). You may find implementing other methods and constructors useful. For example, you'll want a constructor which takes in the size of the OrderList N and creates an OrderList of that size (such a constructor will be used later on when developing the Kitchen class).
The methods of the OrderList interface are:
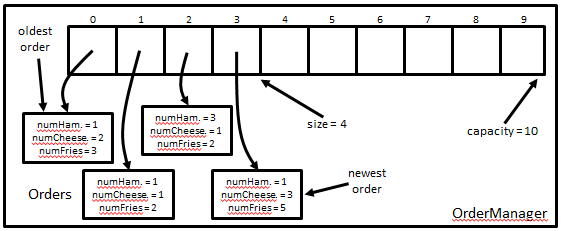
For organizational purposes, let's define the beginning of the OrderList (i.e., index 0) as the oldest Order, and the Order at the size()-1 index as the newest placed order. For the above GUI image, the OrderManager would look like the following:
Incremental testing: As your OrderManager class is essentially a wrapper class for an array with some provided functionality (as defined by the OrderList interface), we recommend that you fully test your class to ensure its correctness before moving on in the project (you'll have to write your own testing program/methods). Interaction between your Chef classes and the BurgerJoint class are dependent on a working OrderManager implementation, so make sure you don't have any issues with your OrderManager class.
Step 2: Designing Your Chef Classes
Three implementations of the Chef interface are required for this project. When asked to cook (by clicking the appropriate button on the GUI), each type of Chef uses a different algorithm to select which order to cook next from the OrderList. The Chef interface contains the following methods:
The three types of chefs select the next Order to cook in the following ways:
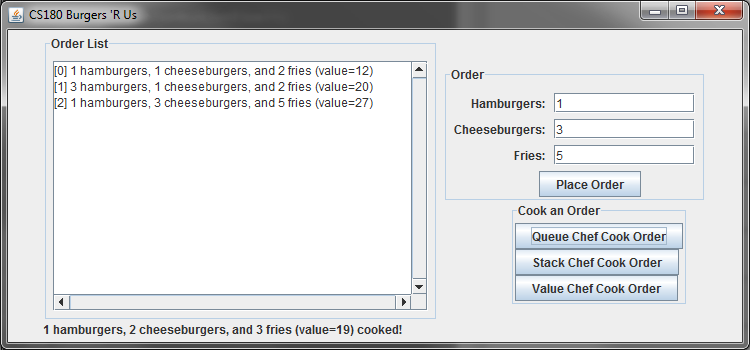
Thus, given the above GUI again with the four placed orders, if we tell the QueueChef to cook an order next, the QueueChef would cook the oldest order at the beginning of the list (1 hamburger, 2 cheeseburgers, and 3 fries):
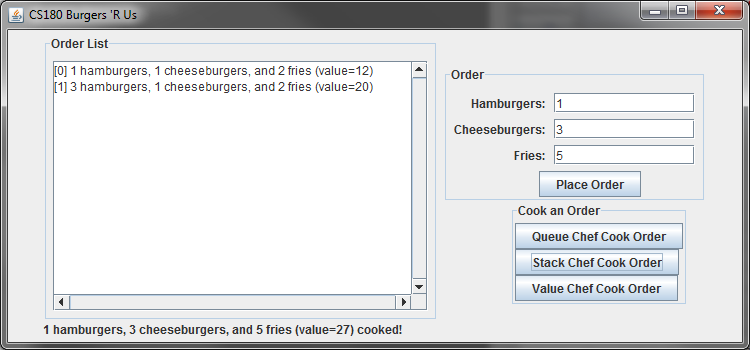
Then, if the StackChef is told to cook the next order, the newest order at the end of the list would be cooked (1 hamburger, 3 cheeseburgers, 5 fries):
Finally, if the ValueChef is told to cook an order next, the ValueChef would choose the order with the highest value to be cooked (3 hamburgers, 1 cheeseburger, and 2 fries):
Incremental testing: Like before, you should be able to test the interaction between your OrderManager and each Chef class incrementally. You'll have to write your own testing program to do so, but making sure everything works correctly will make your life easier in the last stages of this project. You may also choose to complete the Kitchen class with only one of your Chef classes implemented (just place class stubs for the other two for compilation purposes). This will allow you to experiment with the GUI to see how the parts of the program interact in its entirety.
Step 3: The Kitchen - Putting the OrderManager and Chefs to Work
The last step is to provide a KitchenInterface object to organize your OrderList and Chef classes. You need to write class Kitchen which implements the KitchenInterface interface. This interface has the following methods to implement:
As suggested by these methods, your Kitchen class should hold an OrderList object as an instance variable. To determine the capacity of the OrderList, you should write a Kitchen constructor which takes in the size of the OrderList and instantiates the OrderList within it. See Project3.java to see how the Kitchen is instantiated and assigned to the BurgerJoint.
After this step, you can test your entire project by running the main method in Project3.java. For your convenience, we have also included an optional command line argument to specify the capacity of the OrderList. If you do not use this argument, the capacity is hardcoded (currently set at 5). See Project3.java for more details.
Handling Exceptions
As you have probably noticed, there are quite a few exceptions to handle in this project. For the most part, the exceptions should be handled whenever you either 1) write a method with a method signature throwing a particular exception (in which you should throw the given exception), or 2) write a method which calls another method whose signature throws an exception (in which you should try/catch the given exception). To summarize the exceptions in this project that you will have to handle:
One more exception does exist (Order.NegativeOrderException), however, you won't have to worry about it as the Order class is provided for you and the exception is already properly handled between the Order class and the BurgerJoint class..
Code Development
Developing your code is a combination of accuracy and style. Here are a couple of reminders to keep in mind while you work on this project:
Project Submission
Once you have completed your project, you should turn in the files you have created using the turnin command. Minimally, you should have the following files that you developed:
First, remove all the .class files and the project jar file from your project folder:
>> pwd
/home/yourlogin/CS180/project3
>> rm *.class
>> rm project3.jar
Next, change your current folder to your CS180 folder and run the turnin command:
>> cd ..
>> turnin -v -c cs180=<your recitation section> -p project3 project3
If you are having trouble submitting your files, talk to your TA for help.
Grading Rubric
Grading of this project will roughly follow the guideline below. It is subject to change depending on how we regard different aspects of the project, however, it will not change significantly.
5 |
Coding standards |
5 |
Program compiles |
30 |
OrderManager class |
10 |
QueueChef class |
10 |
StackChef class |
10 |
ValueChef class |
10 |
Kitchen class |
20 |
Handling exceptions |